Friday, June 30, 2017

DIY - Using A Woodgrain Stamp to Create an Ocean Setting

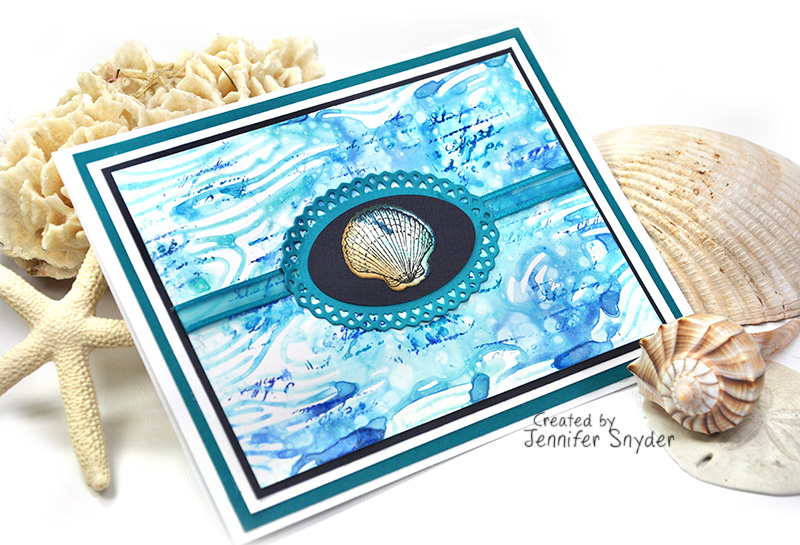
Transforming A Woodgrain Stamp into an  Under-The-Sea Ocean Background

My cards feature some fabulous products from JustRite.  
Scroll on down the page and I'll show you what I did.  Plus I have a 3min video to explain the simple DIY process.  I love short videos.  They rock. 

It's great when you can find multiple uses for products to help stretch the crafting budget and get some added flexibility from your crafty products. It feels GREAT!

That's what I've done with JustRite Papercraft's new Woodgrain background stamp.   I've used this woodgrain stamp to create an ocean setting for my card. 


 The Woodgrain background stamp is magnificent because it's large and fits the entire size of an A-2 card ( 4.225" x 5.5").  It's great for all sorts of crafty projects and perfect for mixed media due to the generous sizing.  BUT I want my stamps to have multiple uses.  

Now it does!  hahahaha.  It doubles as land and sea ( wood and ocean).  
I have multiple samples of my results.   I had so much fun creating these that I could not help myself. 


In addition to the JustRite Woodgrain Background Stamp, I also used the following stamps and dies from JustRite on my cards ( all shown below):


How Did I Do this?

First , I'd like to point out that I used "Specialty Stamping Paper for Inks ".  This is paper with a slippery coating on it meant to make the Distress inks easy to blend.  
Since the paper is coated, it also helps create the watery look by not absorbing the mist and water quickly.  

I used two different mediums to create the cards. The first was made using various blue mists sprayed on the stamp for the ocean.  
The second was crafted by stamping various Distress inks directly onto the stamp for the same effect.   

 You can also use acrylic paints thinned out with a bit of water as well. 

The first few cards shown below are made with mist.  

Here is the Short Video


Whatever mediums you chose to use, multiple colors will work best and provide the most effective ocean background.  

These are the Mists I used.  I guess I might suggest adding the darkest color last and sparingly at that.  You can add more dark but it's much more difficult to lighten something up.    


Any mist will work.  These are also perfect for the project: 

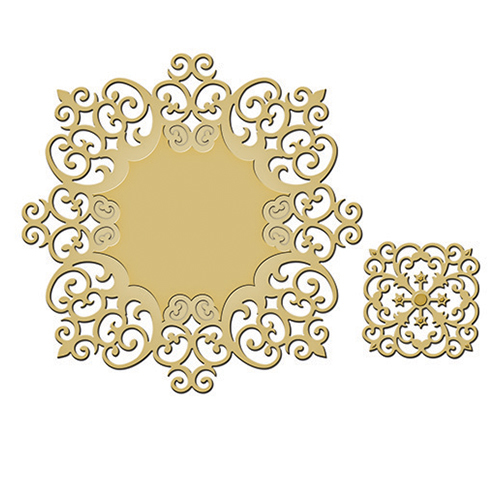
My beautiful center medallion embellishments were made using the some stamps and dies from JustRite Papercrafts


Method Two Using Tim Holtz Distress Inks

I know Tim Holtz Distress Inks are wildly popular.  They are perfect for these kinds of projects.  They react so nicely with water.  I thought I would provide a sample using Distress Ink as well.  

Once again I used the Specialty Stamping Paper for Inks  here as well.  

Tim Holtz Distress Inks to Use: 

The Shell Images

I adore the shell images.  These are JustRite - At the Beach Clear Stamp Set  .

If you watched my quick video, you may notice that I stamped with the assistance of the Misti Stamping Tool - (Most Incredible Stamping Tool) .

Do I love my MISTI?  You bet I do.  I am not a good stamper so the MISTI helps me add more ink perfectly when I need it.  In fact during the video, I needed to go back in with more ink to complete the  stamped image with multiple colored inks as I wanted.   That's where my MISTI helps create perfection. 


Thanks for stopping here.  I value your time. 


Supplies
JustRite products
JustRite Woodgrain Background Cling Stamp - CL-05110 (4 1/4" to 5.5" A2 sized)
JustRite Sea shells at the Beach Dies - DIE 05058
JustRite - At the Beach Clear Stamp Set -CR-05057
JustRite Joy Oval Frame Dies set Die- 05049

Color Bloom Mists to use:
Prima Color Bloom Mist - Cobalt 573898
Prima Color Bloom Mist  2 - Dragon Fly 588830
Prima Color Bloom Mist - Summer Sky 573867
Prima Color Bloom Mist Deep Teal - 580322
Prima Color Bloom 2 Mist - Fairy Pond


Tim Holtz Distress Mists to Use: 
Tim Holtz Distress spray Stain - Blueprint Sketch
Tim Holtz Distress Spray Stain Mini- Mermaid Lagoon
Tim holtz Distress Spray Mini -  Broken China
Tim Holtz Distress Spray - Salty Ocean

Tim Holtz Distress Inks to Use: 
Ranger Tim Holtz Distress Inks MINI - Broken China


Ink for Stamping the Shell Images
Tsukineko Versafine Ink - Small Ink Pad - Majestic Blue
Tsukineko Versafine Ink - Small Ink Pad - Deep Lagoon
Tsunkineko Versafine Small Stamp Pad - Onyx Black
Specialty Stamping Paper for Inks 
Heat It- Heat Gun Embossing Tool
Misti Stamping Tool - (Most Incredible Stamping Tool)

Sunday, June 25, 2017

Fancy Graduation Cards Made Easy

Graduation Cards with Spellbinders and Petaloo

It's graduation/commencement time.  Seems most everyone is off to a graduation ceremony, party or at least knows a recent graduate.  Today, graduations are celebrated for so many reasons;  the little wee ones moving from Pre-K to First Grade; dogs finishing up a training program and moving up a level; even moving positions in a company to the next level.  
Graduation  is serious stuff!

I'm sharing in the celebrations with a couple of cards.   I have a few grads in my family so these will be given to my family members as they move forward with  exciting new starts in life.  


My first card uses one of Petaloo/Floracraft's newest releases. 
 This card features the Petaloo/Floracraft  Botanica Collection -Gypsy Rose Bunch in Cream. 
 Actually it has one big flower in the center of the cluster and two smaller flowers nestled on each side.

I used a  recently released die from Spellbinders as well.   The die is Spellbinders Rebel Rose Untamed Heart Die.

 OK here's what I absolutely ADORE about this die...
 I love the elegance the die adds to the card without it being overly heart-like.  It conveys my affection in an artistic and graceful way without the mush and gush of a standard heart shape.

I'm giving the card to my 22yr old niece and while I love her dearly,  I don't know if she would favor a big 'ol mushy gushy heart card from Aunt Jen as congratulations on her achievement.  She's sassy and full of energy so Rebel Rose Untamed Heart Die is perfect.


And a few more close ups of the first card.
 The paper is old My Minds Eye paper, part of the Lost and Found Collections. This one is called Sunshine.  
 
Here is the second card I crafted.  This card features a new flower from the Botanica collection paired with an older Botanica in the same color.  

There are the flowers I chose:
Petaloo Botanica Fairy Rose Bud in Red RS5013-192/4
Petaloo Botanica Collection - Faux Dried Flowers Ephemera in Red 1100-205
The flowers rest atop one of my beloved  Spellbinder dies.  This is  
Here  are a few close ups at different angles.  The Red Elphemera flowers have floral berries in the packet so I used those as additional points of interest. 


Keep your eye on the Petaloo website.  It will be moving soon and is being relocated to the Floracraft website.  Floracraft is the new owner of Petaloo.  You'll be able to see all the new flowers on that site.

If you are interested in learning more about being a Spellblogger, click here for all the information to set you on your way. .   

 Shop for Spellbinders  products and visit their blog for daily inspiration. 
Thanks for stopping here today. I value your time. 
Happy Crafting
#NeverStopMaking  #Spellbinders 


Products Used:
Yellow Card:
Petaloo Botanica Collection -Gypsy Rose Bunch in Cream RS5014-162/4
Paper - My Minds Eye " Lost and Found" Sunshine Collection LF2104

Red Card:
Petaloo Botanica Collection - Faux Dried Flowers Ephemera in Red 1100-205
Petaloo Botanica Fairy Rose Bud in Red RS5013-192/4

Saturday, June 24, 2017

Re-Purposed Decorative Gift Box and Secrets from Jennifer Snyder


Chocolate....Petaloo flowers.....Spellbinders dies...Maja Design papers....and did I mention Chocolate? ahhhh

Today I'm sharing a cheery decorated box and a "behind the scenes glance into Jennifer's sneaky homelife. "

I received my first box of "See's Chocolates"  last Christmas all the way from California.    Let me tell ya....wowzers.  What quality - what deliciousness - and what a chocolaty secret to keep from my family.    My husband will snatch up candy from the counter quicker than one can blink.  I can't have that.  Then I have my kids to contend with and fight off.  Nope can't have that either.

Sorry - no way could I possibly divulge this gift to my family.  So I did the only reasonable thing a responsible mom and loving wife could do - I hid the box and ate them all.  Yes - EVERY heavenly melty wonderful piece of chocolate.

 The box was all that remained from that sensational chocolate memory saved from last Christmas.
 I tucked the empty box in my stash as if it had always been just an empty box.
BUT  now I can enjoy it again and gussy it up!!! (ahhhhh stills smells like chocolate too.)

To do this, I gathered up a few of my favorite products and set to work.   Flowers from Petaloo by Floracraft.  Dies from Spellbinders.  Papers from Maja Design in Sweden.


I grabbed the gorgeous Maja Design collection called Life in the Country to cover the box.
These are the papers I used from the collection and shown in the image below:
Porch, Summer Kitchen, Our Deer Summer Cottage
Next comes the die embellishments.
The top of the box is decorated with a gorgeously fabulous die from Spellbinders called Spellbinders Shapabilities Die - Heirloom Oval.

I added white cardstock behind the die to really make the design pop.
The paper makes me happy and reminds me of a summer picnic.


Next of course - come flowers as decorative toppers.
It's gussied up with some exquisite flowers from  Petaloo by Floracraft:
Petaloo Botanica Collection - Faux Dried Flowers Ephemera in Red 
Petaloo Botanica Fairy Rose Bud in Red (new release available soon)


The side of the box also has a diecut from the same die set, Spellbinders Shapabilities Die - Heirloom Oval.  A sweet little ornament to add additional interest to the sides of the box.


I added paper to the inside of the box as well.  Helps cover up the fact that I actually ate a whole box of chocolates.  Chocolates?  What chocolates.  Not me!  hahahaa


More views of the box.  


Keep your eye on the Petaloo website.  It will be moving soon and is being relocated to the Floracraft website.  Floracraft is the new owner of Petaloo.  You'll be able to see all the new flowers on that site.

If you are interested in learning more about being a Spellblogger, click here for all the information to set you on your way. .   

 Shop for Spellbinders  products and visit their blog for daily inspiration. 
Thanks for stopping here today. I value your time. 
Happy Crafting
#NeverStopMaking  #Spellbinders 


Products Used
Maja Design -Life in the Country Collection   Porch, Summer Kitchen, Our Deer Summer Cottage
Spellbinders Shapabilities Die - Heirloom Oval S4-447
Petaloo Botanica Collection - Faux Dried Flowers Ephemera in Red 1100-205
Petaloo Botanica Fairy Rose Bud in Red RS5013-192/4
Red Gems
Floral Berries
Gold Trim

Sunday, June 11, 2017

Succulent Stamp Fun

More Succulent Stamp Fun!
I've been having a wonderful time this past month using the newest release from JustRite Papercraft.  

My background stamp is from JustRite PaperCraft Succulent - Background Cling Stamps  and is great for experimenting with technique.  It's big and covers the entire background of an A2 card.  The size of the stamp is also ideal for folks who love mixed media ( and so many other crafting projects.) 

 Here is the gorgeous stamp.  


I have a number of other projects I made with this same stamp - and even a tutorial showing how I used the stamp: 
You can see the whole tutorial with my DIY bright cheery cards here
 You can see more warm and soothing examples here on my Hope-Butterfly card. 


But back to the card for today....

I used the Succulent stamp  to add dimensional layers simply by stamping onto colored cardstock and adding gold embossing powder for the outline of the stamp, then cutting the stamped images out.    I did use my amazing Misti Stamping Tool ( Most Incredible Stamping Tool  to stamp the images.  I'm hooked on that tool - just can't stamp without it these days.  

I added some accents to the edges of the cut-outs with Distress inks in Tim Holtz Distress Inks - Spiced Marmalade.
The layers add such a cool element. 

 Another close up of the card of this "must have" background stamp.  You can grab your stamp here.   


Thanks a million.  You can follow JustRite on Facebook  to find out about the weekly sales.  


JustRite PaperCraft - Background Cling Stamps  -Succulent -CL06001
Clear Embossing Ink
Heat It- Heat Gun Embossing Tool
Tray Mate - Craft Tray PP11710
Clear Embossing Powder - Super Fine Gloss
Tim Holtz Distress Inks - Spiced Marmalade
Tim Holtz Mini Ink Blending Tools
Clearsnap Colorbox Fingertip Daubers ( Blending Tools)
Tsukineko Fantastix Blending Tools
Misti Stamping Tool ( Most Incredible Stamping Tool )

Saturday, June 10, 2017

Maja Design Purple Floral Card with JustRite Die

I'm here today to share my card combining many wonderful products - Petaloo accent flowers, JustRite Dies and Maja Design papers. 

Purple and green are among my favorite color combinations.  Toss in  rich chocolate brown color and you have the Fika collection from Maja Design.  

I adore this classic collection.  I did have to stop hoarding the paper and actually cut it up to use, however there is still a part of me that wants to hoard away forever.  But we all know in our hearts that paper is meant to be used and enjoyed on projects and not tucked away on a shelf. 


I accented the card with some fabulous purple Petaloo Flowers from the Botanica Collection - Baby Blooms .  They are a perfect match and help to add a delicate touch.  They also do not overwhelm the card.  

I've added a beautiful die from JustRite Papercrafts - A2 Graceful Lines Die .  This die was fun to use here because the green papers from the collection make this die pop with beauty and grace.


Oh the gorgeous Petaloo flowers here...

Thanks everyone for your constant support.  

Tuesday, June 6, 2017

Succulent Stamp and Butterflies -Bold and Bright


Newly released and boldly gorgeous- JustRite has a new large cling stamp that has the full coverage needed for a card.  The size of this stamp is 4"x5.25" so it fits on an A2 card nicely. 

Background stamps are also great to use for texture on cards, tags, ATC's , scrapbook pages, mixed media projects and so much more.  

My background stamp is from JustRite PaperCraft Succulent - Background Cling Stamps  and is great for experimenting with embossing and inking.  This card actually was easy to make.  


Here are my quick steps 
Step. 1 - I stamped the image onto " Specialty Stamping Paper for Inks"  using Clear Embossing Ink and the  Misti Stamping Tool ( Most Incredible Stamping Tool ).   This helps provide a clear and crisp image.  I am not looking for a distressed image - I really am desiring a crisp clean image.   For this reason, I also did not choose to use distress embossing ink. 

Step. 2 -  I coated the specialty paper with clear  super fine embossing powder (white embossing powder works nicely here as well).   Heat and set with a heat embossing tool/heat gun

 Tip - With products like embossing powders, glitter and beads, I find that clean up is much easier when using a craft tray to help catch all the extra product.  I'm not really great at sweeping and vacuuming so I like to avoid that one task when possible. 
  

Step. 3 -  Pick some Distress inks and start blending.   I was able to blend gorgeous color combinations on the specialty stamping paper using various Distress Inks and blending tools.


Here is a list of the Distress Inks I used:
Tim Holtz Distress Ink- Rusty Hinge
Tim Holtz Distress Ink- Vintage Photo
I added a small sentiment using JustRite's Small Oval Wishes Stamp set.  This collection has a great variety of all purpose sentiments that seem to cover most occasions.  They are small sentiments that can be added and not overwhelm your beautiful artwork on the card.  

I stamped the word "HOPE" with black ink and covered with clear embossing powder (followed by a blast of the heat gun to set the embossing powder). to give is a crisp clean finish. 

Thanks for stopping here to look and share your time with me.  I appreciate this a great deal. 

JustRite's Small Oval Wishes Stamp - CR-05053
JustRite PaperCraft - Background Cling Stamps  -Succulent -CL06001
Clear Embossing Ink
Heat It- Heat Gun Embossing Tool
Tray Mate - Craft Tray PP11710
Clear Embossing Powder - Super Fine Gloss
Tim Holtz Distress Inks - Squeezed Lemonade
Tim Holtz Distress Inks - Spiced Marmalade
Tim Holtz Distress Inks - Fossilized Amber
Tim Holtz Distress Inks - Vintage Photo
Tim Holtz Distress Inks - Rusty Hinge
Tim Holtz Mini Ink Blending Tools
Clearsnap Colorbox Fingertip Daubers ( Blending Tools)
Tsukineko Fantastix Blending Tools
Specialty Paper for Stamping
Misti Stamping Tool ( Most Incredible Stamping Tool )